5 Photoshop Tips For Beginners To Start Creating Magic

Photoshop, once you get to know it, is an incredibly elegant and powerful piece of software. That’s why these photoshop tips for beginners are often career-changing.
When it comes to creating, editing, remixing, improving, and exporting almost any kind of two-dimensional media, Photoshop has been my long-suffering partner-in-crime for upwards of eight years. I’ve done posters, social media graphics, and new logo designs, all from this tool.
Across the multiple machines I’ve used and multiple versions of the software, our partnership has been unshakable.
My Photoshop workflow is probably my greatest asset as a professional. I’ve produced much of the work I’m most proud of in my life entirely in Photoshop. I literally do not go a day without using it.
I really, really love working with Photoshop. There is no alternative, at least in my eyes.
Learning how to use Photoshop, however, is a complete pain in the butt.
Once you’ve successfully reformatted your brain to express your intentions in the specific way Photoshop will accept them, using it to do basically anything is a complete breeze.
Up until that point, it can be a nightmare. You may have to run everything you do through a frustrating filter of Google searches and failed attempts.
Unfortunately, the only real way to overcome this language barrier of sorts is to just learn the language. Spend hours and hours gradually developing a literacy with the SaaS tool.
For me, doing so took between one and two years of semi-regular use. It’s definitely worth the effort. But those beginning months trying to teach yourself the software can be a painful and slow period.
However, just because the learning curve is absolutely real doesn’t mean that you necessarily have to go it alone.
In fact, taking the time to learn a few tools early can help you start to get some extremely satisfying and super professional-looking results even if you’re just getting started with Photoshop.
These are the top easy-to-use features that make Photoshop so completely impossible for me to live without.
Photoshop Tips For Beginners
1. Take Full Advantage of Layers
If you’re an absolute Photoshop novice, this is the first feature you should master. Thankfully, it’s not that hard to wrap your head around.
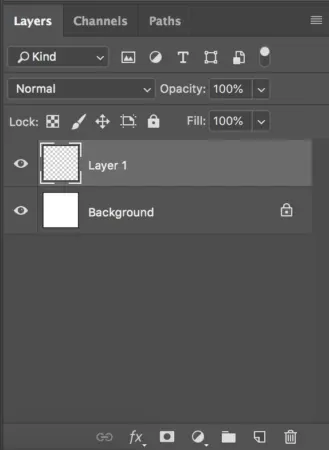
The layers window (pictured on the right) is one of Photoshop’s longest-standing and most-useful features, and learning its quirks early is a great way to maximize your early successes with the program.
Essentially, for any project you start in Photoshop, the layers window gives you the opportunity to isolate just about anything — text, graphics, whatever else you’re working with — onto a transparent “layer” all by itself.
The final image you see is a composite of all of those layers on top of each other (layers closer to the top of the Layers window are on top of ones closer to the bottom).
You can create, reorganize, or delete as many layers as you want — just hit the little Post It Note icon in the bottom right of the Layers Window to create a new one. Layers can be renamed, color-coded, and transformed in all sorts of exciting ways.
The reason why the layers window is such an undeniably essential part of any Photoshop project is because layers allow you to start to achieve non-destructive editing. If you’re not already familiar, non-destructive editing techniques — like a well-organized layer system — allow you to make whatever changes you want to your image without ever permanently altering any part of it.
In other words, you can always go back to the way things were when you started. If you’re photoshopping a bird onto a tree, for example, non-destructive editing techniques will allow you to revert back to both the original image of the tree and of the bird relatively simply if you so desire. No mistake can totally ruin your work!
For the most part, non-destructive editing techniques are more advanced that the scope of this article, but something as simple as making sure all your project elements are on their own layer will transform your image editing capabilities pretty much instantly.
Too many layers to keep organized? Simple — click the folder icon (next to the new layer button) and you can group layers together into collapsible folders.
It can be a pain to get started with this — except to find yourself accidentally working on the wrong layer more often than you’d like — but once you’ve made a habit of properly managing your layers, you’ll find you have so much flexibility to use Photoshop to confidently make any changes you desire.
2. Enhance Your Precision with Brush Settings
So, you’ve imported an image into Photoshop and it’s on its own layer (good job!). No matter what edits you have in mind for this image, it’s pretty likely that they’ll require you to use a Brush of some variety.
At first pass, one could be forgiven for assuming that only the Paintbrush tool uses Brush settings, but Brush settings are used to control the way your eraser, cloning, and other image-manipulation tools work as well.
This is actually pretty convenient. Learning how to adjust your Brush settings once gives you a strong working knowledge of many tools in Photoshop.
There are plenty of minute adjustments you can make to your brushes behavior.
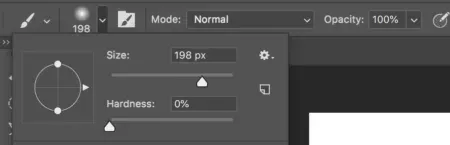
But there are three I use every single time I do anything in Photoshop: size, hardness, and opacity. Understanding how these three sliders transform your Brush will revolutionize the way you use many tools in Photoshop.
Size is obvious. It makes the radius of your brush bigger. But hardness is less so. At 100% hardness, the edge of your radius will be a harsh cutoff point for your tool.
If you’re using the Paintbrush tool, for example, the edges of your lines will be crisp. But at a lower hardness setting, those harsh edges turn into soft, feathered ones.
This is extremely useful: if you’re using the Eraser, for example, maybe you want to carefully edge in closer and closer with a gentle-edged tool instead of making a harsh move all at once. The hardness slider enables this super easily.
Opacity has similar usefulness: you could think of it as adjusting how “powerful” your tool is. Want to erase an element of your project, but not all the way? You’re one slider away from achieving that.
Whether you’re using the Sponge tool to desaturate a portion of your canvas or adjusting how much the Clone tool samples your background image, there’s rarely a case where it’s not useful to make minor adjustments to the size, hardness, and opacity of your brush. Learning this toolset early can demystify so many of Photoshop’s more advanced features.
3. Make Quick Repairs in Seconds with the Spot Healing Brush
Ok, now it’s time to really make some stuff happen in Photoshop.
You’ve just found the perfect photo for your next project. Except there’s one detail you wish you could just remove entirely.
For many people, element removal is one of the definitive Photoshop features. But this typically involves challenging Photoshop skills that amateurs struggle to perform.
Unless they use the Spot Healing Brush, in which case they can probably make those changes almost instantly. This is also a great opportunity for you to flex your recently learned Brush settings skills.
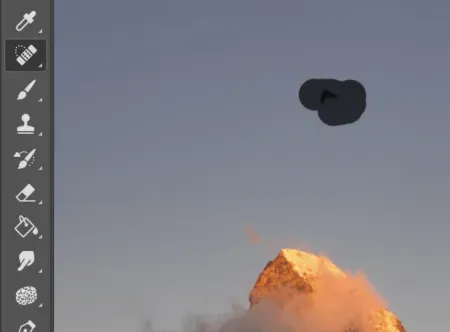
To use the Spot Healing Brush, select it and then scribble over the part of the image you’d like to remove. (Make sure you’re working on the same layer as the image, of course).
That’s basically it. Photoshop uses its Content Aware technology to estimate what the element of the photo was covering and remove it instantly.
This might seem like magic, and it’s not. Content Aware Fill is far from perfect and will result in really wonky-looking fills more often than sometimes, especially over rough backgrounds. But in a wide number of cases, this is the perfect tool to quickly make huge changes to photos in Photoshop.
What’s much closer to magic, however, is how effective Content Aware Fill can be at removing elements extremely quickly when paired with more advanced Photoshop techniques. So when combining this tool with the Clone Tool, Brush Tool, Eraser Tool, and some careful filtering and color selection can make even the most troublesome artifacts vanish super fast.
The Spot Healing Brush is a great tool for beginners to use that only gets more useful the more you learn to do in Photoshop. Use it often.
4. Transform Your Work with Layer FX
Speaking of simple, beginner-friendly ways to make huge transformations fast in Photoshop, meet the Layer FX panel.
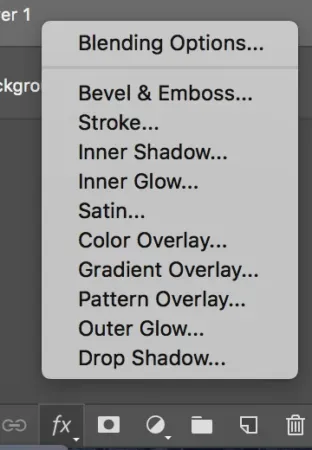
Just click the “FX” icon in the Layers window and you’ll view tons of powerful options to transform layers.
Some, however, are more powerful than others.
Consider, for example, the Drop Shadow tool. This amazing tool instantly generates shadows for any object at multiple angles, sizes, distances, and transparencies. Or the Stroke tool, which draws a line of variable width and color (or gradient!) around the perimeter of any object.
Or, indeed, the Color Overlay tool, which does what you might initially think the Paint Bucket Tool should do (covers all pixels on a layer with a certain color).
What makes these tools so awesome for beginners is how little actual manipulation of elements on the Canvas is required to make tons of commonly-requested changes.
Real-time previews are also supported. So you can just experiment with the various slider options until you have a result you’re happy with.
And, of course, all of these filters are non-destructive editing techniques, and can easily be temporarily hidden or permanently deleted without altering your original image.
The tools hidden away in the Layer FX panel are low-risk, low-skill, high-impact opportunities to make extremely useful everyday changes. Especially if you’re just starting out, they’re a great way to produce some results you can feel proud of as you start to get more familiar with Photoshop’s advanced features.
5. Create Using Quick Selection and Select & Mask Tools
If seamlessly removing an element from a photo is one of Photoshop’s most iconic and widely useful features, seamlessly adding an element to a photo is certainly another. Whenever most people ask me to teach them how to use Photoshop, this is typically their first request. “How can I combine multiple photos in a way that looks natural?”
To do this, you’ll need to do a few things. Select a part of an image, copy it, and then paste it into a new image. There are lots of minute details to pasting elements naturally into new images. But for most people, the selection is the most challenging part to get started with.
Like removing background elements from photos, this is a skill you can spend a very long time refining and improving. But this is made far easier and more accessible with the help of a few very useful tools.
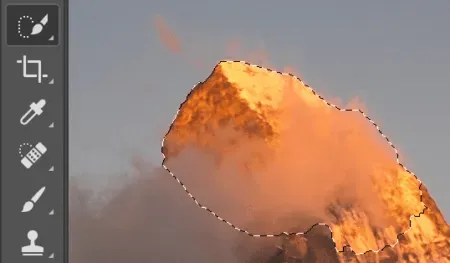
Quick Selection does exactly what it sounds like it would. Simply drag your Quick Selection brush over your image and Photoshop will automatically detect edges and make a pretty accurate selection extremely quickly. For high-contrast images, this tool is often all you need. But like the Spot Healing Brush, it is far from magic, and often needs manual adjusting.
Thankfully, Photoshop provides a dedicated method of adjusting selections without a lot of manual work.
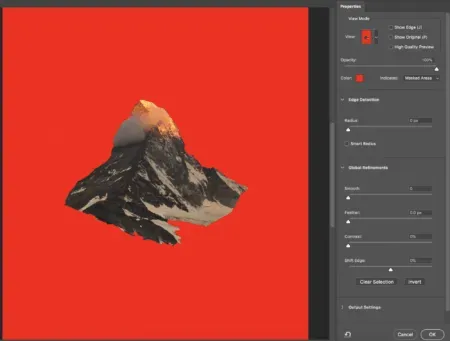
Access the Select & Mask Tool by clicking “Select & Mask” on the top bar after you’ve made a selection. From here, just like with Layer FX, you have tons of sliders to play with to improve your automatic selection.
I recommend enabling Smart Radius and playing with the Radius slider to easily improve finicky selections. Other tools, like shifting the edge in or out by a few pixels or feathering edges, also prove extremely useful.
Unfortunately, these two tools will probably still not be enough to prevent you from ever having to do manual selections. But they go a long way toward minimizing that work.
Especially for those working with high-quality source photos and only making simple edits, these two tools can make otherwise complex photo manipulations easy and intuitive.
And there you have it! With a little bit of guidance and the right fundamentals, even amateurs can use Photoshop to make simple adjustments and create extremely useful images.
Soon you’ll pick up more Photoshop skills for beginners, and soon experts, that further improve the quality of your graphics. You’ll start designing Mailchimp email templates, logos, menus, and social media images every week in Photoshop.
Before you know it, you’ll wonder how you ever lived without Photoshop.
Jeremy Johnson
Owner
Jeremy co-owns Robben Media and directs strategy for every client engagement. With a Computer Engineering degree from Missouri S&T, he brings deep technical expertise in web development, SEO, and automation. Before acquiring Robben Media in 2023, Jeremy led marketing and branch management in the mortgage industry. He believes marketing should be measured by revenue generated, not impressions reported.
Related Services
SEO Services
Stop guessing with your SEO. Partner with a results-driven SEO agency focused on boosting your visibility, leads, and growth.
Paid Advertising PPC
Drive ROI with optimized PPC campaigns across Google, Meta, and other top platforms.
Social Media Marketing
Grow your brand with strategic content, engagement, and multi-platform management.